When I was looking for AirPods online, aside from the official Apple store, I’ve seen a lot of great deals. Most, if not all, of them signified the AirPods were genuine, and if I didn’t know any better I’d grab them in an instant!
As AirPods are among the top Apple products, it’s obvious to come across counterfeit manufacturers in the market. Like any typical Apple product, AirPods are expensive, so if you are thinking about buying a discounted or used pair, you have to be cautious while evaluating your options. Otherwise, you may end up buying fake AirPods.
So, how to spot fake AirPods? Here’s how.
How to Spot Fake AirPods
To spot fake AirPods, you can locate the serial number inside the AirPods case and match it with the serial number on the barcode of your original AirPods box. Be sure to check the font used on stickers. They should be in San Francisco font with a flat gray color on them instead of black.
1. Cross-check the Serial Number on the AppleCare Website
One of the easiest ways to spot counterfeit AirPods is to cross-check the serial number for a warranty on Apple’s Service and Support Coverage website. You can locate the serial number underneath the AirPods charging case lid (right beside the left AirPod) or on the original packaging near the barcode.
Once you write down the code, type it on Apple’s coverage check page. If Apple’s website can confirm the serial number, then your AirPods are genuine. They will provide every piece of information regarding your AirPods, including the date of purchase, service coverage, and call support.
However, if Apple can’t pull up the code from their records, they probably didn’t manufacture your AirPods. Therefore, you will receive an error message when you verify the serial number.
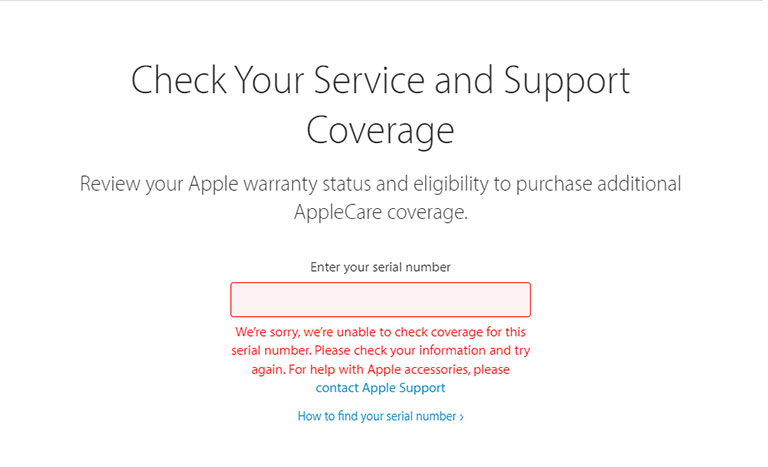
Sometimes, you may purchase fake AirPods with an original retail box or charging case. If that’s the case, you must dig deeper to determine if your AirPods are real.
Here’s a quick tip: if you’ve got AirPods Pro or AirPods 2nd or 3rd, you’ll see that a different serial number is allotted to each AirPod, printed underneath the speaker’s heads. Verifying these codes won’t do the trick.
How do you authenticate your AirPods using the serial number?
Once you find the serial number of your AirPods Pro or AirPods, verify if it’s fake or real by entering it on the Apple Coverage Check Page. If these are real, you’ll get this message.
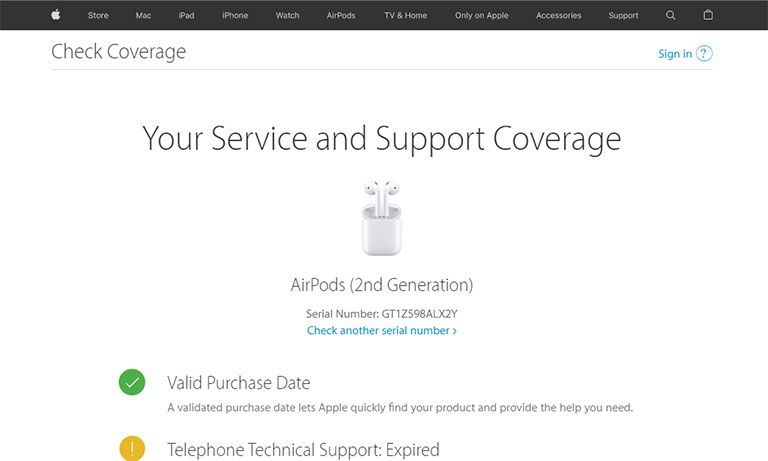
Note: Nowadays, copycat manufacturers are using the original AirPods’ serial numbers and printing them on their fake batches.
The Difference Between the Cost of Genuine vs. Fake AirPods
The difference between the cost of real and fake AirPods is the sole reason for buyers to opt for counterfeit alternatives. After all, spending hundreds of dollars on real AirPods may feel overwhelming, especially when you can get precisely a pair that looks like them for a quarter of the price.
While writing this piece, AirPods Pro cost around $180, and AirPods Gen 3 cost below $200. Even the AirPods Pro (renewed) and AirPods Gen 3 will cost more than $120.
However, some counterfeit manufacturers may raise their prices for AirPods to make them look legit.
So, buying the original AirPods from official Apple stores is best. To find Apple Authorized Resellers, use Apple’s Locate page to discover the nearest authentic sellers.
Note: If you’re purchasing AirPods through online platforms like Amazon, be sure to buy them from the official Apple Store.
2. Inspect the Original AirPods Box for Irregularities
If you know a thing or two about tech brands, you may also know how much Apple focuses on those little details. From its packaging to the product itself, Apple never disappoints.
Thanks to this, replica producers have a harder time manufacturing premium packaging than the earbuds themselves.
To make it easier for you, here’s how to spot fake AirPods boxes:
Note: Some replica manufacturers may get their AirPods packaging right, while others may not. So, it’s always good to know these points while checking out the authenticity of your AirPods.
A. Snug Fit
Who would have thought even the snug fit of AirPods boxes was intentionally put there?
AirPods boxes have two parts—an outer box that contains the product image and an inner box that contains the box contents. To open it, you need to tear down the seal and lift the outer box up. The inner box will come out naturally. The quality of Apple boxes is quite challenging for most replica manufacturers to fabricate.
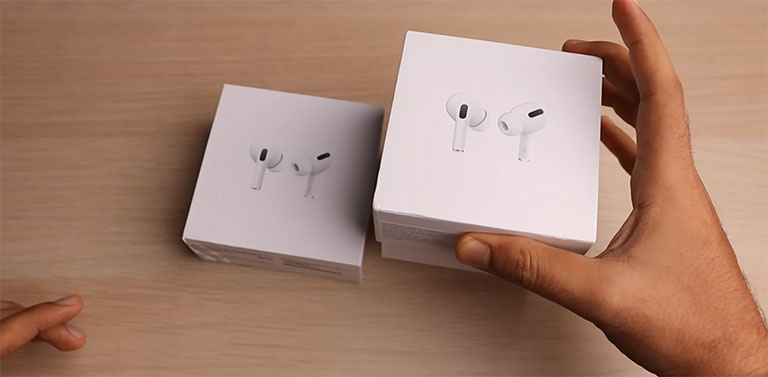
To determine this, get an original AirPods box, familiarize yourself with the suction, and drag, and compare it with your AirPods box. If the suction doesn’t feel the same, then you probably have a fake pair of AirPods.
B. Color and Font Consistency
Finding inconsistencies between fonts and colors is quite tricky, especially when you need an original AirPods box as a reference.
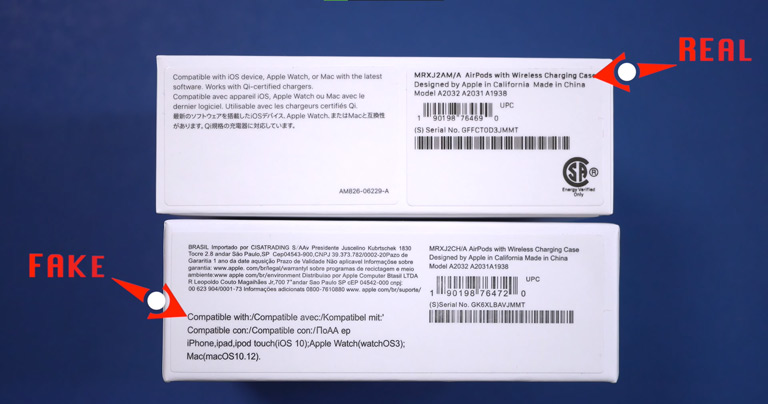
Apple uses the San Francisco font for its content. If you don’t own the original AirPods, you can download the font and print out some text to compare it with.
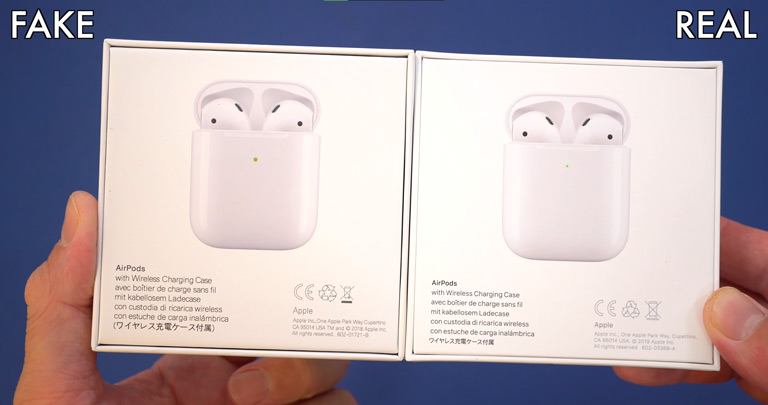
According to our research, common fake AirPods have a taller and thinner font with less space between the words.
You can also check the text color to determine its authenticity. You’ll often notice a darker gray shade on fake AirPods boxes.
C. Box Logo and Contents
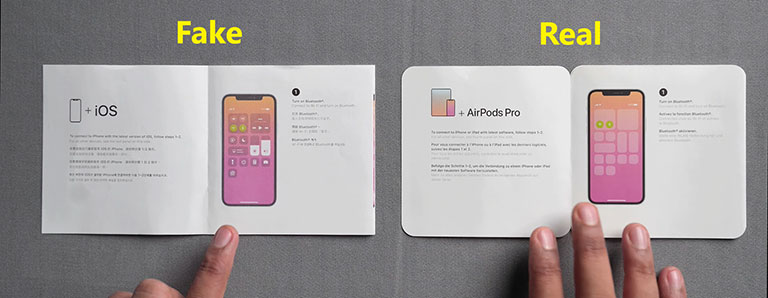
If you haven’t found any inconsistencies till now, you should also know how to spot fake AirPods Pro packaging by inspecting the material inside the box. Fake AirPods boxes often contain only manuals, whereas the authentic ones will have two additional documents, such as the warranty card and the safety sheet.
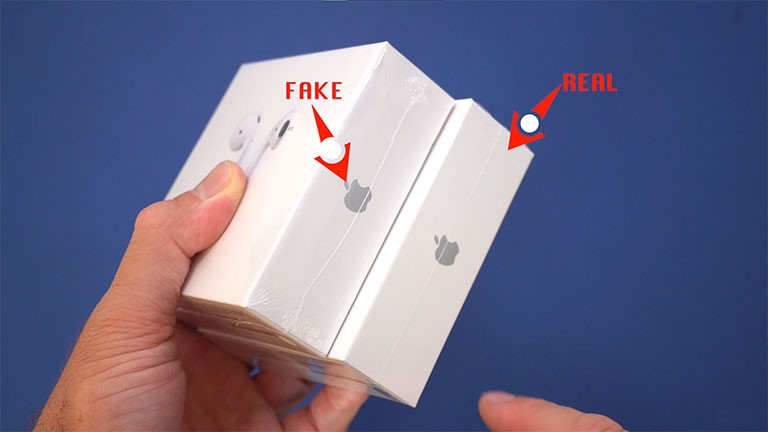
Besides that, people often check the Apple logo on the AirPods’ box for inconsistency. The authentic Apple logo has a more defined and sharper edge along the bite area, whereas the fake one may come with rounded edges.
D. Check for Incorrect or Misspelled Information
Apple probably doesn’t want any typographical errors in its manuals or even on the box. This content is often reviewed by copywriters and proofreaders before a final print.
So, if you spot a typo mistake on the AirPods packaging, you probably hold a replica product.
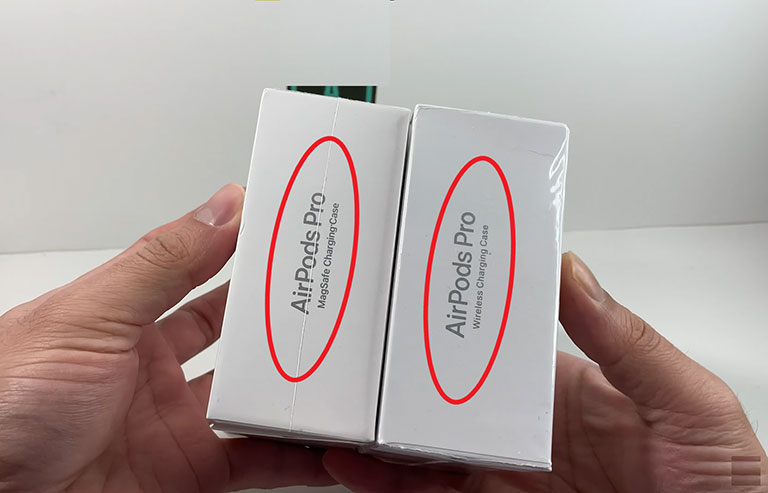
Remember that the labels on the authentic AirPods boxes are separated, whereas counterfeit packages may have a single paper strip.
3. Check the Bottom Side of the AirPods
Next, you should check the bottom of your AirPods, where the charger connects. You’ll notice the bottom grills of genuine AirPods have an oval shape, whereas the fake ones also have an oval shape, but they are a little close to a round shape.
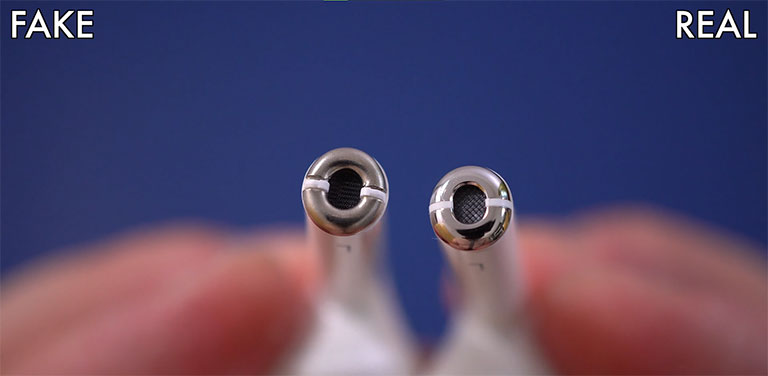
You’ll also notice that the bottom grills on fake AirPods are silver instead of the dark gray used on their genuine counterparts. Apart from that, the white stripe between the charging contacts on fake AirPods is wider than the original ones.
4. Inspect AirPods’ IR Sensors and Speaker Grills
One of the major differences between fake and authentic AirPods is the transparency of their speaker grills. You’ll notice two circular-shaped speakers under the grills on authentic AirPods, which may not be visible on fake ones.
To check the IR sensors, keep your AirPods under an infrared camera to spot the difference.
5. Check the Diffuser
Besides the circular IR sensor, you’ll see a long rounded line on your AirPods, known as the sound diffuser. It should be aligned with the black circle next to it.
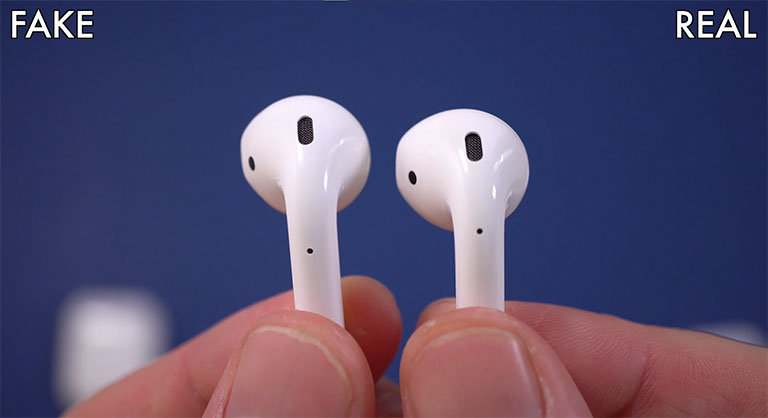
To spot fake AirPods, you’ll see visible grills on the sound diffuser, which isn’t the case for genuine ones.
Keep in mind that the grills are not that polished on authentic AirPods, which usually have flat surfaces aligned with the grills.
6. Inspect Your Charging Case
As discussed earlier, Apple pays attention to every small detail, and the AirPods’ charging case is no different. There are several key areas to check on your AirPods’ charging case, which helps you determine whether it’s authentic or not. To determine this, you need to look for some flaws that Apple won’t commit in the first place.
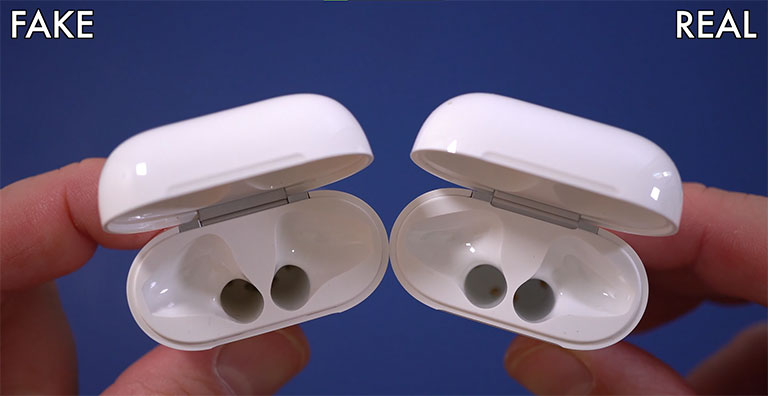
These key areas include the text below the hinge, the charging port, and the multifunction button.
Other signs of counterfeit AirPods include any light on your AirPods or blue light on their charging case. AirPods don’t have an LED, and the status light can’t emit blue light.
A. Multifunction Button and Text
The text below the hinge should say “Designed by Apple in California” and “Assembled in China.”
To spot a fake pair of AirPods, pay attention to the text’s shade, incorrect front use, and spacing errors.
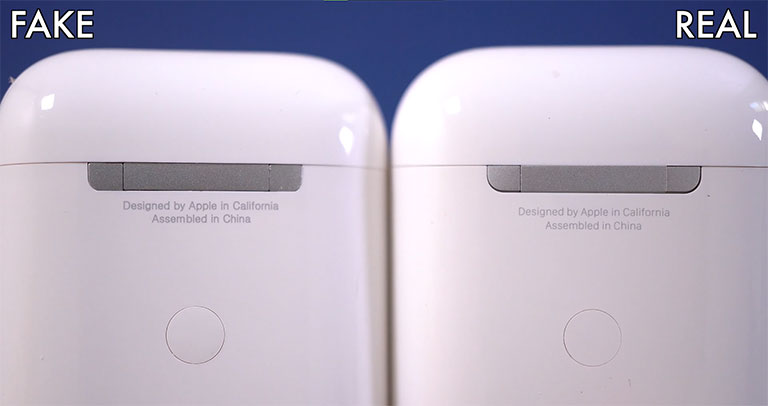
While the multifunction button should align with the case surface, not above nor submerged, fake AirPods have either raised or lose buttons.
B. Check the Light Indicator
Another quick way to determine if your AirPods are fake is to check the light indicator inside the case or on the front. Look for any changes or misplacements in color.
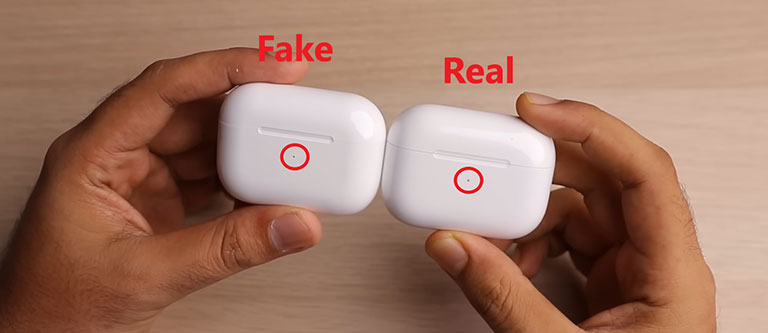
But there’s not much of a difference when comparing fake and authentic AirPods. However, we spotted that the light indicator size is smaller on genuine AirPods compared to their fake counterparts.
C. Check the Charging Port
The charging port is covered with metal. Here you’ll see that the authentic AirPods have a thin metal layer, while the fake ones have a thicker layer.
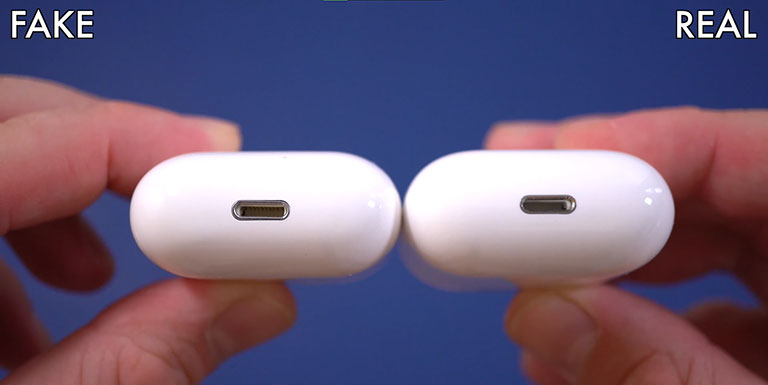
Moreover, if your AirPods Pro doesn’t work with authentic wireless chargers or has a lightning port, you probably have fake AirPods.
How to Know if AirPods Are Original–Check Out These Exclusive Features
If you can’t spot any difference through its physical appearance, here’s how to spot fake AirPods using the software.
AirPods are integrated with groundbreaking features that only Apple’s software can handle. Testing these exclusive features can help you determine whether your AirPods are fake or not. Remember that the following features are only compatible with iOS devices.
Here’s how to know if AirPods are original or fake using the software:
Easy Pairing
Easy pairing helps users pair their Apple devices to their AirPods instantly. All you need to do is open the charging case’s lid and hold it near the Apple device you want to connect it with.
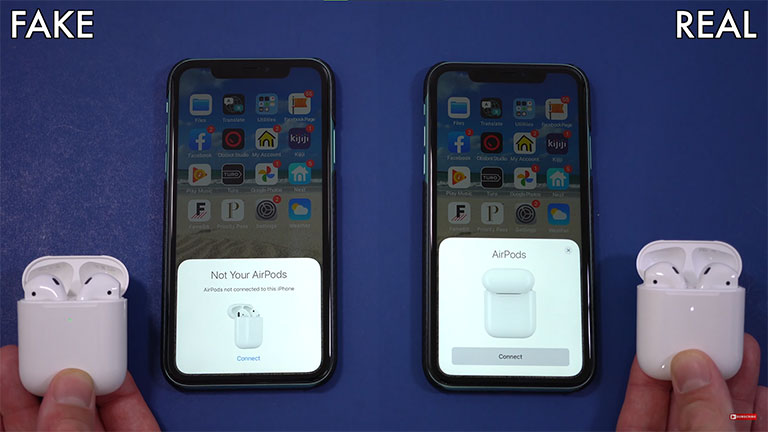
If you’re connecting to AirPods for the first time, you need to click on “connect” on your device to pair them. However, if you’ve already paired it with the same device, you don’t need to do anything else.
For its fake counterpart, the pairing/syncing process won’t be as quick as the original. Plus, you won’t be able to avail of Apple’s replacement services for the product.
Use the “Find My” App
Find My by Apple is a platform that helps users track their misplaced or lost devices and get their location. You can access this platform using the iCloud website or your mobile app.
Thanks to this, you won’t feel frustrated about losing your AirPods—original or not. You’ll likely find your AirPods again using the Find My app, whereas their fake counterparts are probably lost forever.
Authentic AirPods will automatically add up to your Find My account right after you pair them with your device. Original AirPods are compatible with every feature on the Find My platform, including Directions and Play Sound.
If you’ve lost your charging case with one AirPod inside, there’s still hope. You can find your AirPods using the Find My App. Considering your AirPods Pro or AirPods are genuine.
Check the “(i)” Icon
The ‘(i)‘ icon or ‘More Info‘ button next to your AirPods’ name can tell you whether your AirPods are real or not. Here’s how to open the More Info screen on your Apple device:
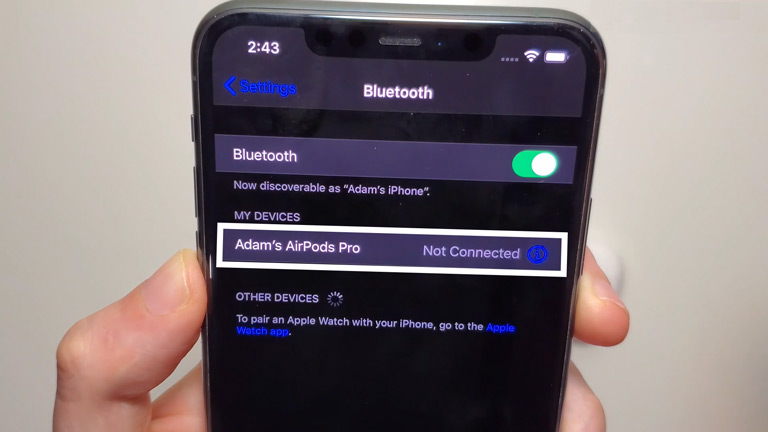
- Open Settings > Bluetooth.
- Check the “(i)” icon next to your AirPods Pro or AirPods’ name.
The More Info button of the original AirPods will include the firmware version, serial number, and model number, along with a “More” button on the screen.
However, the More Info button of its fake counterpart will include information like the name, other Bluetooth settings, and a “Forget this device” option.
Battery Drainage
Though AirPods’ battery health may decrease over time, there are a few issues that could appear in fake ones.
These include the battery percentage of the earbuds or the case not coming up at all in the battery widget, showing wrong battery levels, and excessive battery drainage (even with limited use).
If you experience any of the above mishaps, you won’t be able to seek a replacement for AirPods Pro or AirPods batteries from Apple. There are no replacement options available for any defects in your fakes, which are available for original AirPods.
Frequently Asked Questions
To ensure your Apple AirPods are real, you’ll notice a serial number right next to the Apple logo underneath the speaker holes. To authenticate the AirPods box, the serial number under the barcode should match the number located inside the charging case’s lid.
The first thing you should check is the lettering used for the Apple logo on the box and the AirPods name. If it seems reflective and black instead of flat gray, you’re dealing with a fake pair of AirPods.
To ensure you’ve got the original AirPods Pro box, go through the list below:
– The box should have a snug fit.
– Check the color and font consistency.
– Check the box’s logo and contents.
– Check for wrong information and misspelled words.
The Bottom Line
Determining if a pair of AirPods is real is as tricky as it can be. Counterfeit manufacturers are doing a great job with these replicas in terms of similarity. Luckily, here’s a checklist to go through before you invest in AirPods.
- Cross-check the Serial Number on the AppleCare Website
- Inspect the Original AirPods Box for irregularities.
- Check the Bottom Side of the AirPods
- Inspect AirPods’ IR Sensors and Speaker Grills
- Check the Diffuser
- Inspect Your Charging Case
- Multifunction Button and Text
- Check the Light Indicator
- Check the Charging Port
Hopefully, this guide showed you how to spot fake AirPods. Which inspection worked for you? Do you have any other neat tricks? Please share it in the comments below!
1 Comment
Thank you for being the only content that truly gives me peace of mind that my AirPods are real 🙂